
John Paul Jones
Window of the Revolution
Stained Glass / View All Windows

INSCRIPTION
“To the Glory of God, in honor of John Paul Jones, Captain, U.S.N.
and in memory of
Richard Dale,
November 6, 1756 – February 26, 1826,
First Lieutenant of the
Bon Homme Richard,
Captain, U.S.N.
June 5, 1794,
Commodore, 1801.
This window is given
by his great-grandson
Edward C. Dale
1917”
“To the Glory of God, in honor of
John Paul Jones, Captain, U.S.N.
and in memory of Richard Dale,
November 6, 1756 – February 26, 1826,
First Lieutenant of the
Bon Homme Richard,
Captain, U.S.N. June 5, 1794,
Commodore, 1801.
This window is given
by his great-grandson
Edward C. Dale
1917”
“In the world, ye shall have
tribulation: but be of good cheer;
I have overcome the world.”
—John 16:33B
Original Installation: April 15, 1917
Repaired and restored through gift of:
The Color Guard, Pennsylvania Society of Sons of the Revolution.
Rededication: October 30, 2016
Medallion Reading Order:
Top down on the left, then top down on the right.
Overview
This window highlights emblematic scenes of the Revolution, from its cause to conclusion—an eighteen year period.
It evokes Captain John Paul Jones’s exploits as “Father of the American Navy” through wavy shapes, edges decorated with seahorses, seashells, ships, an overall blue coloration (in this case a nod to the sea), and a medallion depicting Jones’s most famous sea battle.
This window also emphasizes the quintessentially American can-do spirit which Jones is most remembered for, a virtue which time and again helped Patriots snatch victory from the jaws of defeat. Of all the side windows in the Chapel, this one most directly relates to its honoree.
Although Jones’ flamboyant lifestyle is better-known than his Presbyterian upbringing, a 1790 letter encouraging his quarreling sisters to reconcile reveals another side of this rough sailor:
“[T]he sphere in which Providence has placed us as members of society requires the exercise of brotherly kindness….Every lesser virtue may pass away, but charity comes from Heaven and is immortal.” [1]
NKH
Motifs Throughout
Since the John Paul Jones Window was given, in part, as a memorial of the “Father of the American Navy,” The Reverend W. Herbert Burk and D’Ascenzo developed a nautical theme. Thus, the “ground” of the window is in shades of blue and green-blue, evoking ocean waves; the bands on either side contain repeating motifs of seahorses and shells. This was the first window to be completed, and it is the only window which does not contain a geometric pattern as a ground.
Shells: Cowrie, Conch, Scallop
Seahorses: Blue-green and red-orange
JRW
Stained Glass Design
Each of the windows in Washington Memorial Chapel have “medallions” depicting scenes or stories. In between those major medallions are smaller “intermedallions” which represent a theme or motif.
Within the tracery (intricate stonework window atop a stained glass window) are sections called daggers (dagger shaped), kites (diamond shaped) and panels (larger sections).
The slider below shows each section within the window.
-
![Tearing Down the Stamp Act 1765]()
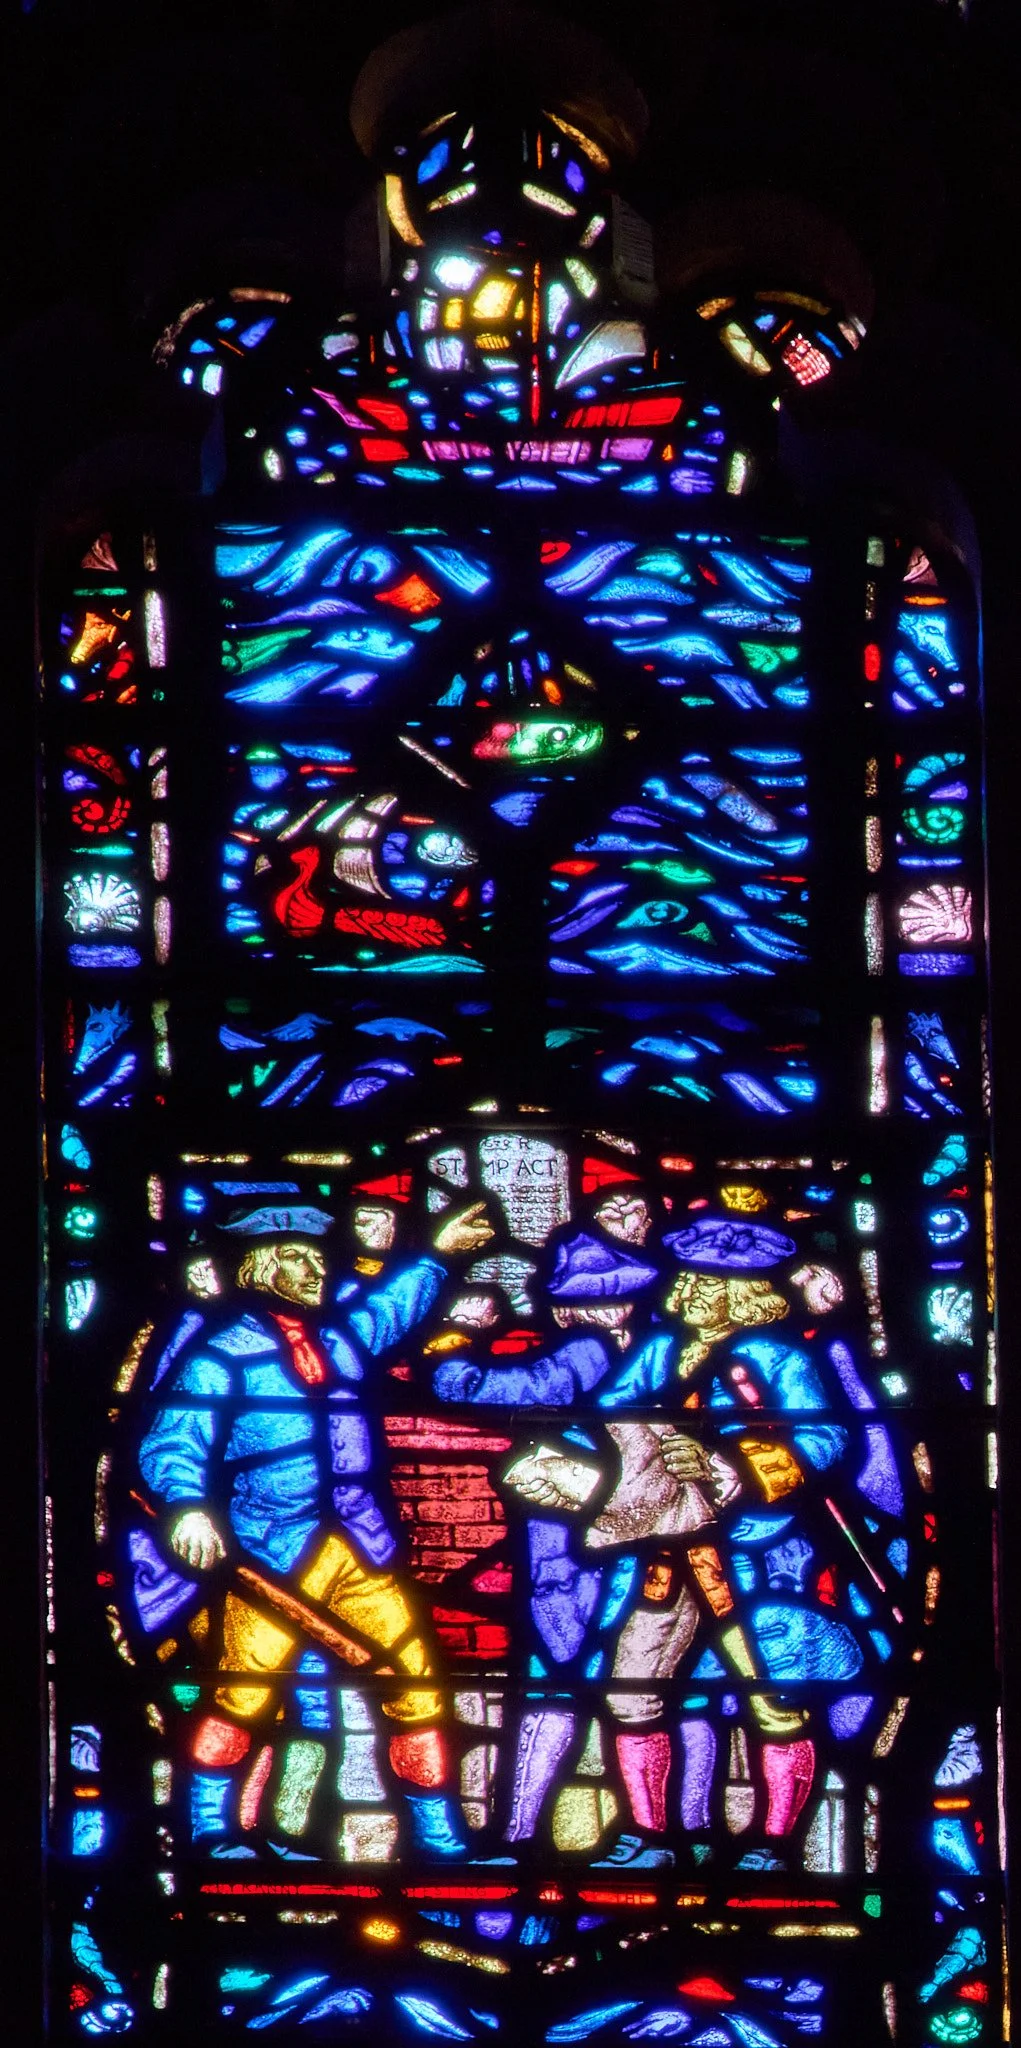
01 Tearing Down the Stamp Act 1765
Colonists read the Stamp Act, posted on a wall. On the left, a man preparing for violent protest, as evidenced by the club in his right hand, points at the Stamp Act broadside. In the middle, a man with clenched fists gesticulates at the announcement. On the right, a well dressed man with spectacles, possibly representing the educated classes, is apparently ripping up a newspaper in disgust.
-
![The Battle of Lexington]()
02 The Battle of Lexington
This medallion shows a drummer and two militiamen at the North Bridge in Concord on April 19, 1775.
-
![Washington Takes Command at Cambridge]()
03 Washington Takes Command at Cambridge
The medallion shows Washington on foot, sword in hand, addressing the soldiers drawn up before him. Washington’s horse is behind him. Washington, in the blue and buff uniform of the 1st Virginia Regiment which he wore when he came to the 2nd Continental Congress, stands in stark contrast to the non-uniform appearance of the soldiers, each clad in some combination of civilian and military garb.
-
![The Evacuation of Boston]()
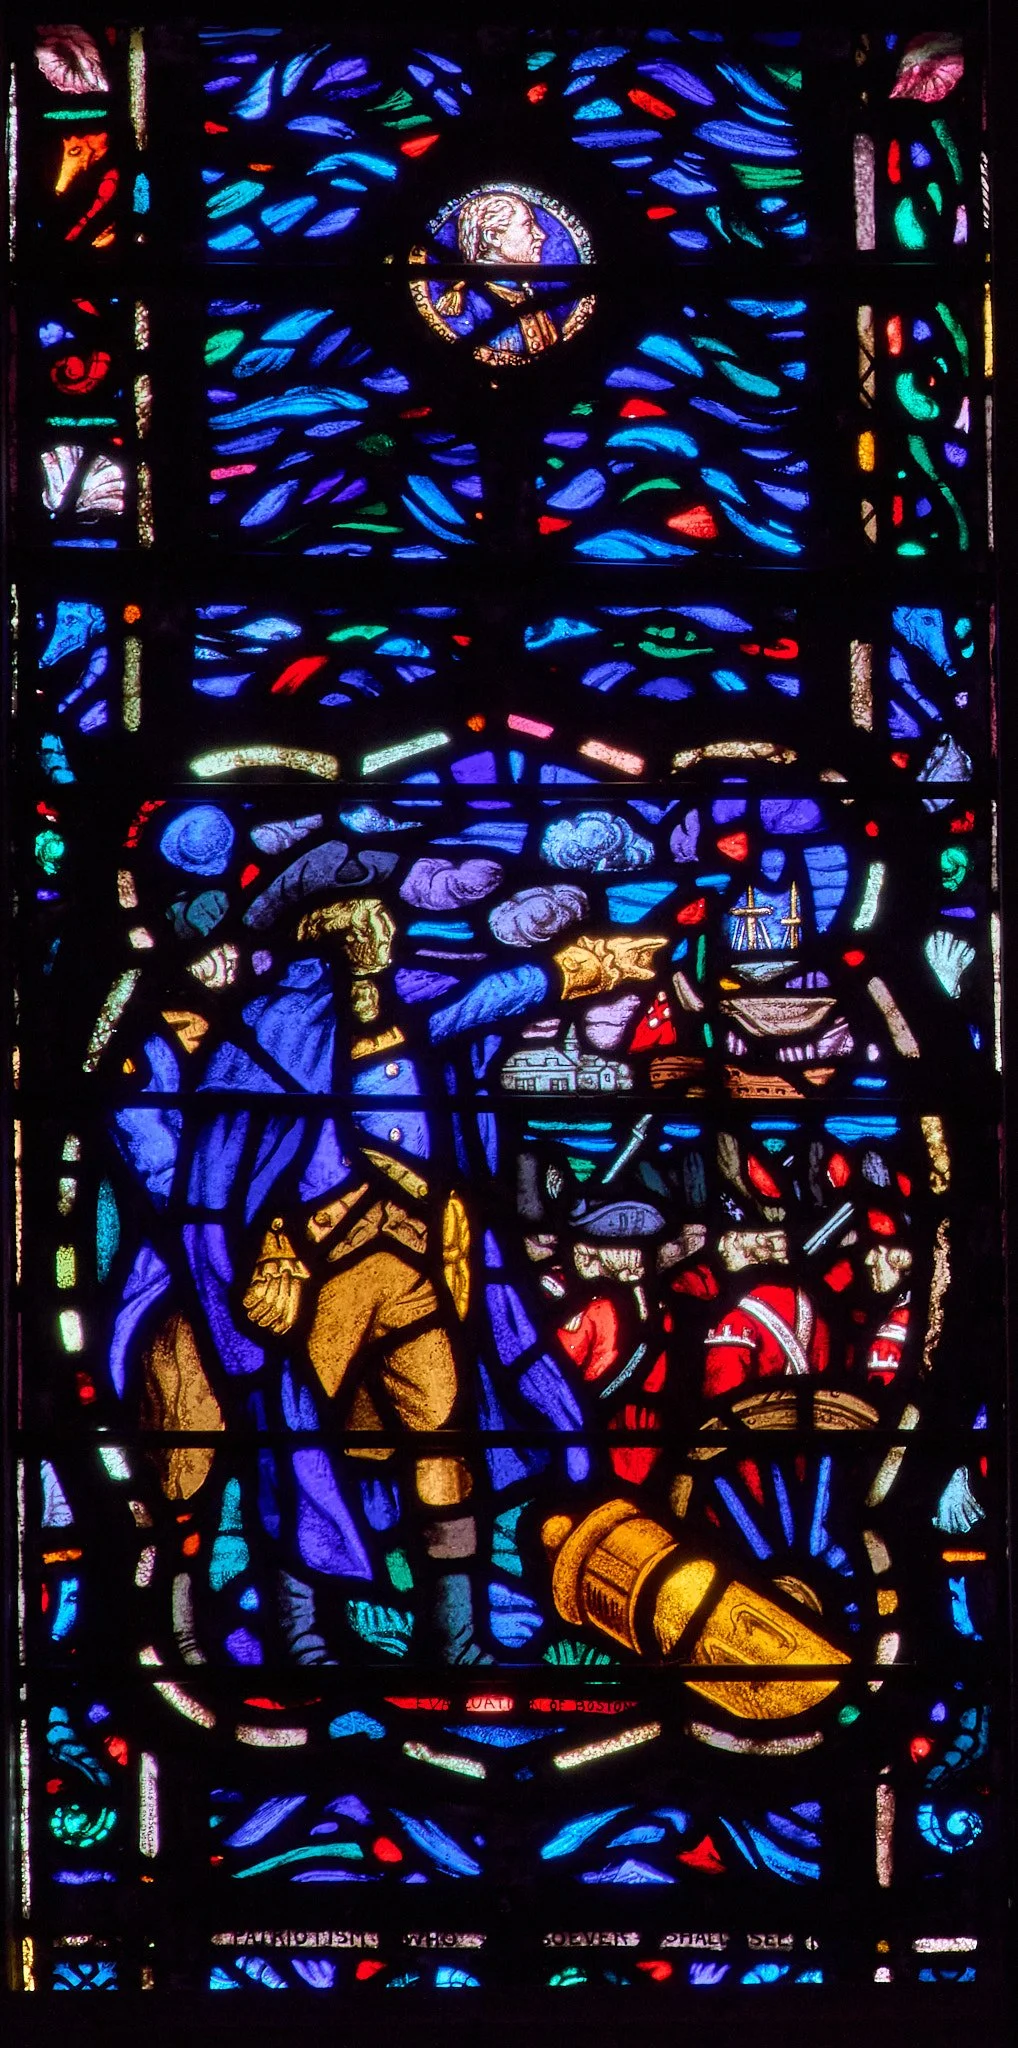
04 The Evacuation of Boston
The Evacuation of Boston medallion depicts Washington on the left in a large figure with British redcoats on the right exiting Boston. In the center is a large cannon representing the cannons captured at Fort Ticonderoga and brought by Henry Knox during the winter of 1775-76 to the army surrounding Boston. Washington, as Commander-in-Chief, led the American troops in the siege of Boston in late 1775-early 1776 in which he prevented the British from moving outside of Boston by land.
-
![Washington Crossing the Delaware]()
05 Washington Crossing the Delaware
Washington stands in the prow of a Durham boat in the company of fellow Virginians. One soldier is fending off an ice floe with an oar. Behind Washington, the Grand Union flag of thirteen stars with the Union Jack in the canton flies, seemingly urging Washington and his soldiers onward through the ice floes towards Trenton and victory.
-
![The Surrender of Burgoyne]()
06 The Surrender of Burgoyne
The medallion shows British General Burgoyne handing his sword to General Gates. Three military figures wearing grenadier hats stand in the background. One, in a gold grenadier hat, probably represents a grenadier of one of the German Braunschweig (Brunswick) regiments, while the two others may represent British grenadiers. The individual in civilian clothes to Gates’s left and rear is probably General Schuyler.
-
![Building the Huts at Valley Forge]()
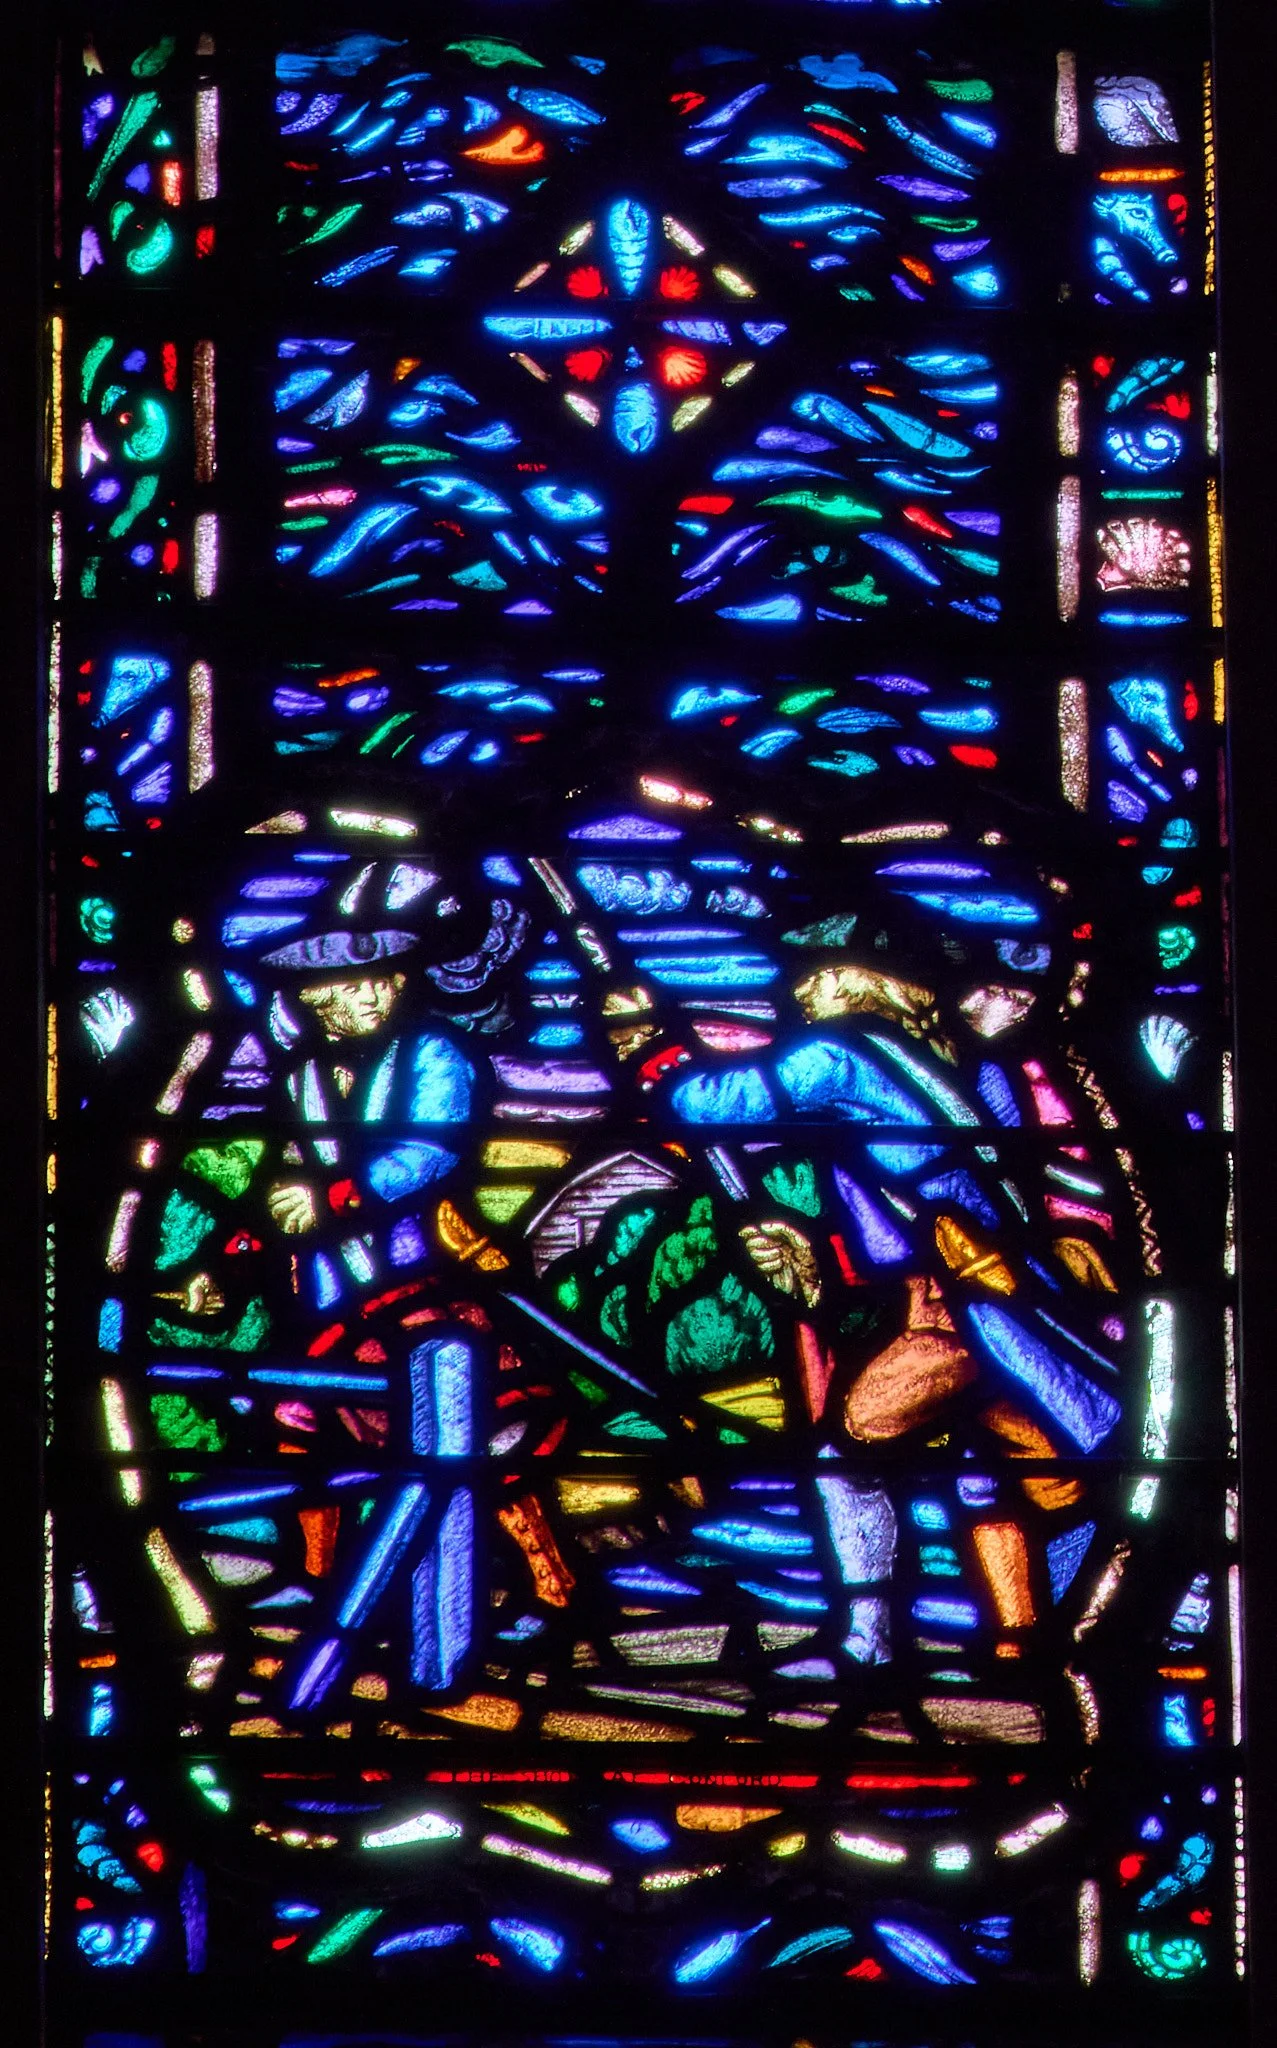
07 Building the Huts at Valley Forge
The Building the Huts at Valley Forge medallion shows men using tools to build the hut under construction in the background.
-
![Martha Washington Ministering to a Sick Soldier at Valley Forge]()
08 Martha Washington Ministering to a Sick Soldier at Valley Forge
Martha Washington, on the left, holds the hand of a sick soldier, his injured arm bound in a sling. She stretches out her free hand in a gesture of comfort. George Washington is shown on the far right, observing Martha’s kindness with approval as he accompanies her visit to his men in a hospital at the Valley Forge encampment. In the rear, a guard looks on.
-
![Celebrating the French Alliance at Valley Forge]()
09 Celebrating the French Alliance at Valley Forge
This medallion shows a line of Continental soldiers facing an officer holding the French trois fleur-de-lys flag. A chaplain reads Washington’s proclamation announcing the Alliance between France and the United States to the troops on May 6, 1778 at Valley Forge.
-
![The Battle of the Bon Homme Richard with the Serapis]()
10 The Battle of the Bon Homme Richard with the Serapis
The battle between the Bonhomme Richard and the Serapis during the Battle of Flamborough Head off the coast of England.
-
![The Surrender of Lord Cornwallis at Yorktown]()
11 The Surrender of Lord Cornwallis at Yorktown
General Charles O'Hara of the British Army stands on the left surrendering General Lord Cornwallis's sword to Major General Benjamin Lincoln of the United States in the center. Standing on the right, Commander-in-Chief George Washington completes the scene marking the surrender of the British following the siege of Yorktown.
-
![Peace]()
12 Peace
A soldier, returning to his family at the end of the American Revolution, hangs his musket over the hearth while his wife and son look on.
-
![Tracery Glass 1 (Panel) Continental Soldier]()
Tracery Glass 1 (Panel) Continental Soldier
Learn the significance of different Continental Army uniform facing and cuff colors throughout the chapel windows.
-
![Tracery Glass 2 (Panel) Continental Soldier]()
Tracery Glass 2 (Panel) Continental Soldier
Learn the significance of different Continental Army uniform facing and cuff colors throughout the chapel windows.


Detailed Medallion Text
01 Tearing Down the Stamp Act 1765
Medallion 1: Tearing Down the Stamp Act 1765
Location: Left lancet, top
Description:
Colonists read the Stamp Act, posted on a wall. On the left, a man preparing for violent protest, as evidenced by the club in his right hand, points at the Stamp Act broadside. In the middle a man with clenched fists gesticulates at the announcement. On the right a well dressed man with spectacles, possibly representing the educated classes, is apparently ripping up a newspaper in disgust.
Background:
A decade before the War for Independence, Britain’s American Colonies were thrown into an uproar when an unprecedented tax passed by Parliament turned many loyal subjects into outraged protestors.
With the imperial coffers drained by the Seven Years' War, the Stamp Act of 1765 sought to offset the ongoing cost of British peacekeeping operations along the colonial frontier by taxing all printed pages (as well as playing cards and dice). Although new taxes are rarely popular, this particular Act raised unique concerns, as it seemed to violate the hard-won right of British subjects to be taxed only by their own elected representatives.
This was the first time that Parliament had ever directly taxed American colonists—a power which for generations had been exercised exclusively by each colony’s own elected legislature. The colonies did not have any Members of Parliament representing them in London.
Colonial lawmaker Patrick Henry’s compelling argument against the Stamp Act in the “Virginia Resolution” (shown in the adjacent Window of Democracy) circulated widely. The rallying cry of “No taxation without representation!” echoed throughout the land.
While other windows highlight the statesmanship of Patriot leaders, this medallion shows the fiery response of ordinary Americans to Parliament’s overreach. The job of tax-stamp distributor quickly became the most unwanted occupation in the colonies as furious mobs attacked “stamp-men” in the street and ransacked their homes. Patriots also organized boycotts of taxed items, and it became impossible to enforce the Stamp Act.
Although Parliament grudgingly repealed the hated tax in 1766, it reasserted its claim of “full power and authority to make laws…to bind the colonies and people of America…in all cases whatsoever.” Yet this lofty pretension could not be imposed without a fight; a vocal minority of colonists had shown the political and economic will to oppose the mightiest government on earth in defense of the “rights of Englishmen,” with brute force if necessary. They would do so again.
NKH
Intermedallion [Surrounding Stamp Act]
-
Early American Navy Ship: Naval vessel flying the Continental Union Flag used from 1775-77.
-
Fish: Center lozenge: A green and red fish. Coloring implies dolphinfish (mahi-mahi), a colorful and agile creature often spotted leaping near boats in the warm ocean waters of the Caribbean. The figure may have been included as a nod to decorative illustrations on older maps.
-
Viking Longship: Distinctly Norse—red hull, dragon-headed prow, and square sail. While certainly associated with Viking predatory acts, the Scandinavian Longship also represents Viking prowess as explorers and navigators. Over time, their culture was exposed to Christianity by the Frankish missionary Ansgar and many others. Leif Erikson, credited as the first European to set foot in the Americas, is portrayed in the Norse sagas as being blown off course on his way to missionize Greenland. Archaeological discoveries in 1960 indeed proved the legendary account of Christian Norsemen having landed in what is now Newfoundland, Canada c. 1000 AD.
NKH
02 The Battle of Lexington
Medallion 2: The Battle of Lexington
Location: Left lancet, second from the top
Description:
This medallion shows a drummer and two militiamen at the North Bridge in Concord on April 19, 1775.
Background:
The opposing causes of British Imperialism and American Independence collided at Lexington and Concord and ignited the American Revolution.
In 1774 the British government appointed General Thomas Gage military governor of Massachusetts. His task was to enforce the “Coercive Acts.” These unpopular and restrictive policies passed by the British Parliament were intended to punish the Massachusetts colony for the Boston Tea Party of 1773. Gage’s harsh enforcement of the Acts led to increasing tribulation for the colonists, political unrest, and calls for representation in London. This culminated in the convening of the First Continental Congress in Philadelphia in October 1774. A group of men in Boston calling themselves “The Sons of Liberty” led by Joseph Warren, John Hancock, John and Samuel Adams, and others began organizing a resistance movement and gathering intelligence on British military operations.
In the spring of 1775 Gage learned that the colonists were storing gunpowder, ammunition, and weapons in the hamlet of Concord, and he ordered the British Army to confiscate them. Patriot spies passed this information to the Sons of Liberty who sent Paul Revere and William Dawes into the countryside on horseback on the evening of April 18th to warn of the British move.
Ferried across the bay from Boston to Charlestown, the British marched toward Concord. Early on the morning of April 19th, select Patriot militiamen, known as “Minutemen” for their instant readiness in case of British aggression, assembled on Lexington Green alongside the road to Concord. A British column led by Major Pitcairn halted there and ordered the Minutemen under Captain John Parker to disperse. A shot was fired, by which side remains a mystery, and the two sides clashed. Several militiamen lay slain, and the remainder ran for cover. The first shots of the American Revolution had been fired.
On arrival in Concord, the British burned houses and barns, but found little in the way of rebel munitions. Meanwhile, hundreds and then thousands of Patriot militia surrounded Concord. A company of Acton Minutemen led by Capt. Issac Davis advanced on the British troops holding the North Bridge over the Concord River. Although Davis died in the action, his men forced the British off the bridge. The event is memorialized in Ralph Waldo Emerson’s “Concord Hymn”:
By the rude bridge that arched the flood,
Their flag to April’s breeze unfurled,
Here once the embattled farmers stood
And fired the shot heard round the world.
Overwhelmed by the swelling ranks of Patriot militia, the British were forced into a fighting retreat all the way back to Boston. Eventually, nearly twenty thousand militia surrounded Gage and the British forces in Boston.
An item related to this historic event is seen on the lectern side of the chancel above the choir stall closest to the altar. There hangs the Bedford Minutemen Flag. This is the oldest battle flag in the United States. It was carried into battle by Nathaniel Page, a Bedford militiaman, on April 19th 1775 at the North Bridge in Concord. The crimson flag shows a mailed hand emerging from clouds brandishing a sword while three cannonballs appear suspended in air. The Latin motto “ VINCE AUT MORIRE “ (Conquer or Die) is emblazoned on a gold ribbon. The original flag can be viewed at the Bedford Public Library.
DRS
Intermedallion [Surrounding The Battle of Lexington]
-
Shell Cross: Center lozenge: A cross consisting of four red turret shells flanked by blue scallop shells.
NKH
03 Washington Takes Command at Cambridge
Medallion 3: Washington Takes Command at Cambridge
Location: Left lancet, third from the top
Description:
The medallion shows Washington on foot, sword in hand, addressing the soldiers drawn up before him. Washington’s horse is behind him. Washington, in the blue and buff uniform of the 1st Virginia Regiment which he wore when he came to the 2nd Continental Congress, stands in stark contrast to the non-uniform appearance of the soldiers, each clad in some combination of civilian and military garb.
Background:
On June 14, 1775, the Second Continental Congress authorized the creation of a Continental Army. The following day, June 15th, Congress unanimously appointed George Washington “to command all the continental forces raised or to be raised for the defense of American liberty.”
Massachusetts, Rhode Island, Connecticut, and New Hampshire militia began the siege of Boston shortly after Lexington and Concord in late April 1775. Ethan Allen of Vermont and Benedict Arnold of Connecticut captured Fort Ticonderoga and Crown Point in early May. By mid-June, perhaps sixteen thousand militia from the New England states ringed the British forces in Boston and the revolt of the American colonies was in full swing. Artemis Ward, a Massachusetts officer and the senior commander on the American side, however, had no authority over the militia of the other states. The militia came and went as they pleased, but the Continental Congress in Philadelphia realized that “a Continental Army was in the field.”
The choice of Washington was due in part to his military experience in the French and Indian War, in part to his “command” presence and bearing, and in part to his being a Virginian. The New England representatives, with the exception of John Hancock who sought the position for himself, believed that they needed to choose a Virginian in order to ensure Virginia’s support for their cause.
Washington left Philadelphia on June 23rd, escorted by the Light Horse of the City of Philadelphia – now the First Troop, Philadelphia City Cavalry. He arrived in Cambridge on July 2nd to assume command of the militia units besieging Boston.
On July 3 1775, on Cambridge Common, Washington took formal command of the Continental Army. The “Army” was not impressive. Washington described it as "a mixed multitude of People... under very little discipline, order or government." Somewhat later he wrote, “such a dirty, mercenary spirit pervades the whole, that I should not be surprised at any disaster that may happen.” “Discipline,” he wrote, “is the soul of an army.” Weapons and equipment were not standard and often rudimentary. In short, the “Army” was a motley array.
Provincial, independent, officered by friends and neighbors, and democratically inclined, the militia resisted Washington’s efforts to instill discipline and create a national, professional army. Washington’s perseverance, however, ultimately resulted in the creation of the regiments of the Continental Line. By the end of the war the Continental Line could stand toe to toe with the British regulars. The colors of the Light Horse of the City of Philadelphia, a yellow flag with a field of thirteen blue and white stripes, hang above the Chapel’s choir stalls.
GPP
Intermedallion [Surrounding Washington Takes Command]
-
Ship’s Prow (facing right): One of two highly stylized prows depicted in this window. Inclusion may be intended as an obscure naval pun from the well-read Burk, since “prow” can also mean “valiant, brave, gallant.” According to the Oxford English Dictionary this medieval usage was common in poetry from the 1800s into the early 1900s.
-
Hessian Soldier: Soldier wearing distinctive mitred brass cap of Hessian grenadiers. His uniform particularly resembles that of the Hessian auxiliaries under the command of Colonel von Rall (see Crossing the Delaware below). A small number of Hessians defected and fought for the Patriots duringthe war, in part because Congress enticed them with offers of land. Five thousand or more of the Hessian conscripts became Americans after the war (both defectors and prisoners).
NKH
04 The Evacuation of Boston
Medallion 4: The Evacuation of Boston
Location: Left lancet, fourth from the top
Description:
The Evacuation of Boston medallion depicts Washington on the left in a large figure with British redcoats on the right exiting Boston. In the center is a large cannon representing the cannons captured at Fort Ticonderoga and brought by Henry Knox during the winter of 1775-76 to the army surrounding Boston. Washington, as Commander-in-Chief, led the American troops in the siege of Boston in late 1775-early 1776 in which he prevented the British from moving outside of Boston by land.
Background:
After the opening battles of the American Revolution at Lexington and Concord, the newly formed Continental Army and associated militias undertook a bold and difficult mission: undertaking and maintaining an unbreakable siege around occupied Boston. Their success convinced British General William Howe to evacuate his forces to Canada.
Following the outbreak of the war in April 1775, the British government sent Generals Howe, Clinton, and Burgoyne with 4,500 soldiers to reinforce the British presence in America. They arrived in May. In June General Gage ordered General Howe to attack and seize Bunker and Breed’s Hills which were part of the American positions surrounding Boston. British casualties were high, however, and the British could not break the Continental Army’s control over access to Boston via the Charlestown and Boston land necks. General Gage was relieved of command and replaced by General Howe in October.
George Washington assumed command of the American forces around Boston in early July. In the ensuing months, there were skirmishes, but no major battles. In November Washington ordered Henry Knox to bring captured cannons from Fort Ticonderoga to Boston. In a challenging and demanding operation, Knox brought fifty-nine cannons weighing approximately sixty tons over three hundred miles of rivers, forest and swamps from Fort Ticonderoga. They arrived in late January 1776. Washington then built a strong siege line around Boston, placing Knox’s cannons on the high ground commanding the Charlestown and Boston land necks and on the Dorchester Heights commanding the harbor.
By early March 1776 General Howe realized he could not break the colonists’ control of the harbor and of land access to Boston. He ordered a complete evacuation of British forces to Halifax, Nova Scotia. On March 17, 1776, 120 British ships departed for Nova Scotia with 9,900 troops and 1,200 women and children, including many Loyalists. Washington and the soldiers he commanded had won an important victory, but seven and a half years would pass before the war was won and independence achieved.
KRD
Intermedallion [Surrounding Evacuation of Boston]
-
Portrait of John Paul Jones: Center lozenge:This is the only miniature portrait of its kind in the Chapel windows. It may have been included so that Jones’s actual likeness would be visible in the window bearing his name, as the scene depicting his valor at the Battle of the Bonhomme Richard and the Serapis is drawn to the scale of the ships.
NKH
05 Washington Crossing the Delaware
Medallion 5: Washington Crossing the Delaware
Location: Left lancet, fifth from the top
Description:
Washington stands in the prow of a Durham boat in the company of fellow Virginians. One soldier is fending off an ice floe with an oar. Behind Washington, the Grand Union flag of thirteen stars with the Union Jack in the canton flies, seemingly urging Washington and his soldiers onward through the ice floes towards Trenton and victory.
Background:
George Washington’s bold crossing of the Delaware River with his army on Christmas night, 1776, and the ensuing capture of an entire Hessian brigade at Trenton the next morning re-energized the flagging American fight for independence.
From the American defeat in the Battle of Long Island in August 1776 through the autumn, the British had made steady advances in New York and New Jersey. They defeated Washington’s army again at White Plains in late October and secured Manhattan at the Battle of Fort Washington in mid-November. Dogged by British and Hessian units, plagued by poor morale, and with the looming expiry of enlistments at year’s end, the army retreated steadily across New Jersey. An army which had numbered twenty thousand men including militia in August, had been reduced through casualties, desertions, and the expiry of enlistments to no more than three thousand when it crossed the Delaware River into Pennsylvania on December 7th.
The nearly 1400 Hessians of Colonel Johann Rall’s brigade stationed in Trenton were also exhausted. They had been worn down by frequent skirmishes, hit and run attacks by militia, and had been discomfited by the Colonial-era rural custom of firing guns into the air at Christmas. They had been on alert on Christmas Eve and remained so on Christmas day. The weather was cold and wet, the visibility limited, and Hessian patrols encountered no signs of a major American attack. Seeing the worsening weather, their commander, Colonel Johann Rall, presumed his men safe, availed himself of a hearty Christmas dinner at the house of a Loyalist, and retired at 2:00 in the morning of December 26th.
The same night, in a daring gamble to achieve a victory before his soldiers’ enlistments expired, Washington led 2400 men back across the Delaware River in Durham boats and commandeered ferry boats to New Jersey. From their assembly point at Johnson’s Ferry, the Americans began their nine mile march to Tenton at 3:00 a.m. on December 26th, launching their attack on the Hessians at 8:00 a.m. The fight was over in less than an hour. Rall was mortally wounded, and died the next day, becoming one of twenty-two Hessians killed. Three Americans were killed, and six wounded, but nearly one thousand Hessians – and their supplies – were taken prisoner.
Medallion Details:
While the composition of the figures is loosely based on that of the group in the famous painting by Emmanuel Leutze of Washington Crossing the Delaware, the scene is more historically accurate, and the soldiers are positioned differently. Washington is depicted in the company of fellow Virginians, where Leutze populated the boat with a cross-section of American society. Instead of the Betsy Ross flag in Leutze’s painting, which had not been designed until 1777, the medallion shows the Grand Union flag. A replica of the Grand Union flag hangs over the choir stalls of the Chapel.
JRW
Intermedallion [Surrounding Washington Crossing the Delaware]
-
Center lozenge: Argent, an iris gules. This was initially borne by the Guelphs, factions supporting the Pope in the Investiture Controversy, a series of late-9th century disputes concerning the selections of bishops and abbots. The Ghibellines, who supported the Holy Roman Emperor’s authority, wore the same emblem with the colors reversed. After the Guelphs consolidated their control in the City of Florence, they further fragmented into the Black and White Guelphs, based respectively on whether they supported or opposed further Papal control of Florentine affairs. Dante, a member of the latter faction, was part of a deputation to Rome during the Sack of Florence in 1301 by the Black Guelphs, and was thereafter sent into exile, during which time he began to compose the Divine Comedy.
JRW
06 The Surrender of Burgoyne
Medallion 6: Washington Crossing the Delaware
Location: Left lancet, bottom
Description:
The medallion shows British General Burgoyne handing his sword to General Gates. Three military figures wearing grenadier hats stand in the background. One, in a gold grenadier hat, probably represents a grenadier of one of the German Braunschweig (Brunswick) regiments, while the two others may represent British grenadiers. The individual in civilian clothes to Gates’s left and rear is probably General Schuyler.
Background:
On October 17, 1777, at Saratoga, New York, a British Army of almost six thousand British and German mercenary soldiers surrendered to the Americans. It was a shocking setback to British plans to quell the American rebellion.
In late 1776, the British Commander in Canada, General John Burgoyne, had proposed a strategy to subjugate the New England colonies with a three-pronged offensive. His army would strike south, control Lake Champlain, capture Fort Ticonderoga, and then either proceed up Lake George to capture Albany or proceed east through the Connecticut River Valley to Rhode Island. In either case he would link up with General Howe’s army from New York. At the same time, General St. Leger would attack from the west via Lake Ontario and the Mohawk River Valley toward Albany. The execution of the third prong, the movement by General Howe, was left to General Howe. General Howe had his own plans, and in early 1777 he received approval from the King to move south from New York to capture Philadelphia.
Aware of this, Burgoyne and St. Leger nevertheless set out in late June 1777. Burgoyne had about 3800 British infantry, almost five hundred artillerymen and their cannon, and a division of about 3500 German mercenaries from the Duchy of Brunswick (Braunschweig) and Lueneburg. St. Leger’s contingent was much smaller, numbering about seven hundred British regulars and as many as eight hundred native american allies.
Over the next six weeks Burgoyne’s army accomplished many of its objectives, capturing Forts Ticonderoga, Anne, and Edward and defeating the Americans at the battle of Hubbardton. But the American victory in late August at Bennington, the defeat of St. Leger at Fort Stanwix, and the increasing difficulty of obtaining supplies brought the British advance to a standstill.
It was not until mid-September that Burgoyne resumed his advance. By this time General Gates’s army had received significant reinforcements and had fortified some high ground dominating the Hudson River. The Americans successfully repelled and then defeated two British probes on 19 September and 7 October, forcing Burgoyne to retreat to Saratoga where his army was surrounded and he was forced to surrender on October 17th.
Burgoyne’s defeat was largely the result of poor planning and underestimating the difficulties of supporting an army in a hostile wilderness. Geography, American resilience, good luck and, in the final weeks, overwhelming force, weighed heavily on the American side. The defeat thwarted the British attempt to cut off New England. Most importantly, however, it demonstrated to the French monarchy that the American states might succeed in defeating or seriously weakening the British Empire, France’s hereditary enemy. Within four months France had signed a Treaty of Alliance with the United States and began overtly helping the American war effort. The resulting French military assistance both on land and at sea were the key to Lord Cornwallis’s surrender four years later at Yorktown.
The colors of the 3rd New York Regiment, which defended Fort Stanwix under Col. Gansevoort, hang above the Chapel’s choir stalls.
GPP
Intermedallion [Surrounding The Surrender of Burgoyne]
-
Ship’s Prow (facing left): Second of two prows appearing in this window. As noted previously, may be a metaphoric use of the word “prow” to imply “valiant, brave, gallant.”
-
Patriot Soldier: Standing at attention; wearing Continental Army uniform (red facings).
NKH
07 Building the Huts at Valley Forge
Medallion 7: Building the Huts at Valley Forge
Location: Right lancet, top
Description:
The Building the Huts at Valley Forge medallion shows men using tools to build the hut under construction in the background.
Background:
Following the clash of the Continental Army with the British forces at Whitemarsh Pennsylvania between December 5 and 8, 1777, Washington faced the difficult decision of the next move for his forces. After the encounter with the British, Washington suffered both mounting criticism for not pursuing the retreating British and conflicting counsel over whether to attack the British in Philadelphia or find a location to winter over and rebuild his army. Ultimately, he chose the latter and convinced the Congress to support his choice.
The choice of a location presented conflicting needs. The site had to be far enough from Philadelphia to discourage the British from attacking, but close enough to protect the Congress in York and local citizens from foraging British troops. It had to possess defensible terrain while providing adequate water and wood and access to local farms and other sources of provisions. General Wayne advocated Chester County as a suitable location and inspection by several officers, including Louis Duportail, who was the French head of the infant Army Corps of Engineers, confirmed the location.
Beginning December 11, 1777, approximately twelve thousand troops left Whitemarsh fording the Schuylkill River to undertake the trek to Valley Forge. The cold and wet march was miserable for all.
Once on site, Washington spurred action to build the huts and cabins needed to shelter the men. He ordered commanders to divide their units into twelve man squads with each squad to erect its own living quarters. He offered a $12 reward to the squad in each regiment that completed its cabin first, and a $100 reward if someone could figure out a roof structure that did not consume scarce wood. He issued an order that cabins should be sixteen feet deep and twelve feet wide by six and a half feet high with a dozen straw covered bunks attached to the walls.
The soldiers completed nearly two thousand huts in about a month. Final structures varied greatly due to the scarcity of tools and the quality of design and carpentry skills of regiments. Northern regiments were more skilled at building huts to keep out wind and cold. Soldiers chinked gaps between logs with mud and clay, and often covered doorways with tents. Few huts had wood flooring, some had fireplaces, and none had glass windows.
Deeply aware of the discomfort his men were enduring, Washington slept in his tent outside his eventual farmhouse headquarters until all the men had cabins for shelter. History confirmed the wisdom of his decision to winter his troops. The Continental Army was in much better physical condition, provisioned, and trained when it emerged from Valley Forge on June 19, 1778 to confront the British at Monmouth County, New Jersey. Washington and his troops faced challenges wintering at Valley Forge that surely reflect the admonition in John 16: 33: “In the world, ye shall have tribulation, but be of good cheer, I have overcome the world.”
KRD
Intermedallion [Surrounding Building the Huts at Valley Forge]
-
Galley: The galley was a type of ship initially developed in the Mediterranean basin. Typically lateen-rigged, galleys were powered by rowers, which provided a competitive advantage in close-quarters warfare during the Age of Sail. The Rhode Island General Assembly authorized the construction of two “row galleys” in 1775, the Washington and the Spitfire, to defend the Narragansett Bay. Following the declaration of American Independence, these were dispatched to join the fledgling American Navy at New York. On August 16, 1776, the Washington was the flagship of a successful attack on the British ships Phoenix and Rose; no further record of the Washington exists following the capture of New York that autumn. Row galleys also played an important role in the Battle of Valcour Bay, Lake Champlain in 1776.
-
Waves: Center lozenge: blue and green waves. The continuation of the window’s background waves into the center lozenge emphasizes the vast expanse of the open sea.
JRW
08 Martha Washington Ministering to a Sick Soldier at Valley Forge
Medallion 8: Martha Washington Ministering to a Sick Soldier at Valley Forge
Location: Right lancet, second from the top
Description:
Martha Washington, on the left, holds the hand of a sick soldier, his injured arm bound in a sling. She stretches out her free hand in a gesture of comfort. George Washington is shown on the far right, observing Martha’s kindness with approval as he accompanies her visit to his men in a hospital at the Valley Forge encampment. In the rear, a guard looks on.
Background:
The Reverend Burk intended this tribute to Martha Washington’s supportive presence at Valley Forge as a broader symbolic reminder of the many Patriot women who, in a civilian role, rendered invaluable service to the Continental Army.
Martha Washington, like many other women during the war, managed the family business in her husband’s absence. In her case, this was a massive responsibility because of the size of their Mount Vernon plantation. However, she also joined General Washington in the field during all eight winter encampments of the War for Independence; this added up to almost five years away from home during the conflict. Her carriage ride north from their estate to Valley Forge took ten days of travel along rough roads. Once in camp, she served as headquarters operations manager—on top of her social duties as hostess to officers, officers’ wives, and visiting dignitaries such as Continental Congress delegates and foreign diplomats. [1]
This medallion closely parallels a medallion in the facing “Window of Patriotism” (first column, sixth from top), which symbolizes Patriot military surgeons through the figure of the Biblical physician St. Luke. Similarly, in addition to her own story, Martha Washington in this medallion represents the four hundred ordinary Patriot women who encamped at Valley Forge with the fourteen thousand military men. These female “camp followers” faced hunger, disease, and deprivation alongside the soldiers, to whom many of them were married. The humble roles they performed, such as nurse, laundress, seamstress, or cook, were of vital importance. They did this hard work for scant pay in usually miserable conditions, often while caring for children. [2]
There is only one authentic account of Mrs. Washington visiting with the common soldiery at Valley Forge as shown in the medallion. Ninety-four year-old veteran Alexander Milliner, who was an eight-year-old drummer at the time of the encampment, recalled that Martha “used to visit the hospitals, was kind-hearted, and had a motherly care.” [3]
It is well-attested that Mrs. Washington’s confidence in the cause and the Commander provided a much-needed morale boost to discouraged officers at Valley Forge. “Her presence inspired fortitude,” recalled Colonel Pierre S. DuPonceau, “and those who came to her with almost desponding hearts, retired full of hope and confidence in the wisdom of their rulers, in the talents of their chief; and in the high destinies of their country.” [4]
Other stories about her kindness to the troops, which lack eyewitness support, still accurately reflect her character. At Mount Vernon, Martha personally looked after the health and wellness of everyone on the estate—family members and workers (both free and enslaved) alike.[5] It is thought that she also visited sick and needy members of her local church daily, encouraging them with readings from the Bible and the Book of Common Prayer. Additionally, she was financially generous throughout her life.
In the George Washington Window (sixth column, fifth from top), Martha Washington is depicted back at Mount Vernon after two terms as First Lady, strolling the peaceful grounds with the retired President.
NKH
[1] Nancy K. Loane, Following the Drum: Women at the Valley Forge Encampment (Washington, D.C.: Potomac Books, 2009), 11-14.
[2] Loane, Following the Drum, 113-28.
[3] Loane, Following the Drum, 149-64.
[4] Loane, Following the Drum, 163.
[5] Kim Curtis, “Martha Washington’s Preoccupation with Health,” Washington Papers, June 21, 2019.
Intermedallion [Surrounding Martha Washington Ministering to the Sick Soldier at Valley Forge]
-
Ship: Center lozenge: a small, square-rigged sailing ship.
-
Patriot Soldier: Leaning on musket; wearing Continental Army uniform (buff facings).
JRW
09 Celebrating the French Alliance at Valley Forge
Medallion 9: Celebrating the French Alliance at Valley Forge
Location: Right lancet, third from the top
Description:
This medallion shows a line of Continental soldiers facing an officer holding the French trois fleur-de-lys flag. A chaplain reads Washington’s proclamation announcing the Alliance between France and the United States to the troops on May 6, 1778 at Valley Forge.
Background:
The winds of war had shifted as a powerful new ally formally entered the American Revolution on the side of the colonists. In the wake of the American victory at Saratoga, the diplomatic mission to the French Court of King Louis XVI was able to complete the Treaty of Alliance with France on February 6, 1778. The treaty brought critical support to the American Revolution in terms of armaments, finance, and troops. Occurring at the nadir of the Continental Army’s strength during their winter encampment at Valley Forge, news of the treaty brought jubilation and comfort to Washington’s beleaguered soldiers. What had been an isolated colonial rebellion had now been transformed into a worldwide conflict.
When news arrived in Valley Forge on May 5, 1778 that the treaty had been ratified by the Continental Congress in York, Pennsylvania three days earlier, Washington ordered a day of celebration for the entire army the following day. Washington’s general order for the day begins: “It having pleased the Almighty Ruler of the universe propitiously to defend the Cause of the United American States, and finally raise up a powerful Friend among the Princes of the Earth, to establish our Liberty and Independence upon a lasting foundation, it becomes us to set apart a day for gratefully acknowledging the Divine goodness, and celebrating the important event which we owe to His Divine interposition.”
The next day, with the army formed upon the Grand Parade, each brigade’s chaplain read news of the treaty and offered a prayer of thanksgiving to his assembled men. Throughout the day cannons were fired, and the entire army formed a battle line firing their muskets in succession (termed a “feu de joie” or fire of joy), and cheered “Huzzah, Long live the King of France, Long Live the Friendly European Powers” and “God save the American States!”
There are several items in the chapel relating to the French Alliance and the influence of French assistance in the cause for American freedom. To the right of the lectern stand two traditional French flags on permanent display in honor of the Treaty of Alliance between France and the Continental Congress. The blue flag with three gold fleurs-de-lys is the traditional flag of the French monarch dating back to 1304. The white flag is the Bourbon Royal Standard of King Louis XVI, king of France at the time of the Revolutionary War. In the Porch of the Allies is the bay honoring General Lafayette. The adjacent doorway leading to Patriot’s Hall is painted French blue and finely decorated with brass fleurs-de-lys designed by Samuel Yellin. It is another tribute and sign of gratitude to the French nation and people for their aid in our time of need.
DRS
Intermedallion [Surrounding Celebrating the French Alliance at Valley Forge]
-
Anchor: Center lozenge: A red anchor on a blue field. In the Epistle to the Hebrews, Christ, as the only hope of salvation, is likened to an anchor; consequently, the anchor is widely seen as an emblem of hope - hence the emblem on the seal of the State of Rhode Island.
JRW
10 The Battle of the Bon Homme Richard with the Serapis
Medallion 10: The Battle of the Bon Homme Richard with the Serapis
Location: Right lancet, fourth from the top
Description:
The battle between the Bonhomme Richard and the Serapis during the Battle of Flamborough Head off the coast of England.
Background:
John Paul Jones, considered by many the “Father of the United States Navy,” fought the most famous naval battle of the American Revolution against a British frigate off Flamborough Head, England on September 23rd, 1779.
Jones, born John Paul in Scotland, began his maritime career at the age of thirteen in 1760. Over the next ten years he rose to command several British merchant vessels and acquired a reputation for skilled seamanship and iron discipline. After killing a mutinous sailor on his ship in Tobago, he fled rather than face a trial, came to Virginia, changed his name to John Paul Jones, and befriended many influential Virginians. Based on both his experience and these acquaintances, he received a commission in the newly formed Continental Navy in 1775. On December 3, 1775, as First Lieutenant on the Continental Navy’s frigate Alfred, he raised for the first time the first American flag, the Grand Union, over an American naval vessel. In 1778-79 commanding the Continental Navy ship Ranger,he raided various ports in England, Scotland, and Ireland.
In February 1779 Jone assumed command of a French merchant ship converted to a thirty-eight gun frigate to which he added four cannons and renamed Bonhomme Richard in honor of Benjamin Franklin, whose Poor Richard’s Almanac had been published in France as Les Maximes du Bonhomme Richard. Departing the coast of Brittany on August 14, 1779, Jones led a small squadron of five ships around the British Isles successfully capturing a number of British merchantmen. In the evening of 23 September Jones and his squadron encountered a British convoy of forty ships escorted by the British frigate Serapis, forty-six guns. Bonhomme Richard engaged Serapis while the remaining ships of Jones’s squadron chased the convoy.
Since his ship was both slower and less heavily armed, Jones had to maneuver to get close enough to board Serapis and gain control in hand-to-hand combat. Captain Pearson of Serapis sought to keep his distance and pound his opponent into submission with overwhelming firepower.
Eventually the two ships collided and American sailors tossed grappling irons onto Serapis, locking the ships together. For three and a half hours, the ships continued to fire at each other, many of Serapis’s shot passing directly through Bonhomme Richard and Jones’s ship taking on water from holes below the waterline. At one point, Bonhomme Richard’s flag was shot away and Captain Pearson, thinking Jones was surrendering, yelled to Jones, “Have you struck?” Jones is reported to have replied, “Surrender be damned, I have not begun to fight.”
At length an American grenade thrown through one of Serapis’ hatches ignited a powder magazine resulting in a devastating fire. When another ship in Jones’s squadron arrived on the scene, Captain Pearson, realizing the merchant ships had escaped, decided to surrender. Historians estimate 170 Americans and 120 British were killed or wounded.
A replica of the Grand Union flag with thirteen red and white stripes and the Union Jack in the canton hangs over the choir stalls on the east side of the Chapel. The Gadsden flag was also one of the flags raised on the USS Alfred. This flag features a coiled rattlesnake on a yellow background with the phrase “Don’t Tread on Me.” It was initially used by the Continental Marines. The Gadsden flag is on the Brigadier General pew screen.
FPS
Intermedallion [Surrounding The Battle of the Bon Homme Richard with the Serapis]
-
Shell Cross: Center lozenge: A cross consisting of four red turret shells flanked by violet scallop shells.
-
Indian: Figure wearing blue blanket and red headdress, possibly meant to indicate Patriot allegiance.The majority of Native American nations in the area of conflict remained neutral or directly sided with the Crown, due to both monetary incentives and territorial considerations. However, a few tribes—notably the Oneida, Tuscarora, Catawba, Maliseet, and Stockbridge-Mohicans (some of whom served as Minutemen)—allied themselves with the American colonists.
JRW
11 The Surrender of Lord Cornwallis at Yorktown
Medallion 11: The Surrender of Lord Cornwallis at Yorktown
Location: Right lancet, fifth from the top
Description:
General Charles O’Hara of the British Army stands on the left surrendering General Lord Cornwallis’s sword to Major General Benjamin Lincoln of the United States in the center. Standing on the right, Commander-in-Chief George Washington completes the scene marking the surrender of the British following the siege of Yorktown.
Background:
The British surrender at Yorktown on October 19, 1781 spelled the end of the British effort to suppress the American rebellion and led to the Treaty of Paris and American Independence in 1783.
Following indecisive battles in the Carolinas, British General Charles Cornwallis had marched his army north with the goal of controlling Virginia. Cornwallis was ordered to establish a protected harbor at Yorktown for the British fleet.
Camped outside New York City in the spring and early summer of 1781, Washington had hoped to capture the city. He was joined in early July by about five thousand French soldiers under the French general Comte de Rochambeau. Despite these reinforcements, Washington decided that the British position in New York was too heavily defended. Receiving news in August that the French fleet under Admiral de Grasse would sail north from the Caribbean to operate off Virginia, Washington turned his attention to defeating Cornwallis in Virginia and ending the British threat in the southern colonies.
The combined American and French forces began their march to Virginia in late August. Washington ordered Lafayette, who with Anthony Wayne had about four thousand men in the area, to keep Cornwallis bottled up in Yorktown until he and Rochambeau arrived.
Admiral de Grasse’s fleet reached the Chesapeake Bay in late August as well, and in a week-long engagement in early September defeated the British fleet under Admiral Graves in the Battle of the Capes. Graves withdrew his ships to New York, leaving the French in control of the Chesapeake and preventing the reinforcement or evacuation of Cornwallis’s army at Yorktown.
Washington and Rochambeau arrived at Williamsburg on September 14th. With Lafayette and Wayne and troops brought by de Grasse, total Allied strength rose to eighteen thousand to twenty thousand men. Cornwallis and his eight thousand to nine thousand British and Hessian troops were surrounded and outnumbered.
On September 28, 1781, French cannons opened up and three hours later George Washington fired the first American cannon. The American and French cannon fire weakened the British redoubts, which were then overrun by American and French troops. This allowed the cannons to move closer to Yorktown. Without hope of reinforcement or evacuation, Cornwallis’s position was untenable, and he surrendered on October 19th.
Cornwallis declined to attend the surrender ceremony due to illness, sending his second -in -command, General Charles O’Hara, to surrender his sword. George Washington sent Major General Benjamin Lincoln to accept it. Yorktown was the last major battle of the Revolution, but the war continued for another eighteen months.
Medallion 20 in the George Washington window shows him firing the first American cannon at Yorktown. The gunner who loaded the cannon is to his left and Lafayette stands to the right of George Washington. This medallion is in the middle section, second from the top in the right lancet.
Medallion 21 in the George Washington window shows him extending his hand to Count de Grasse. Washington visited the French Admiral on September 16th on his ship, the Ville de Paris, to thank him for his naval support at Yorktown. This medallion is directly below medallion 20.
FPS
12 Peace
Medallion 12: Peace
Location: Right lancet, bottom
Description:
A soldier, returning to his family at the end of the American Revolution, hangs his musket over the hearth while his wife and son look on.
Background:
The story of the American Revolution, as portrayed in the John Paul Jones Window, is one of the struggle for a cause and of overcoming adversity. The window traces this struggle from Colonial discontent prompted by the Stamp Act, to victories against unfavorable odds, to no less a figure than Martha Washington doing her part to boost morale. As the overall theme of the window is “Be of good cheer, for I have overcome the world,” it is only right to conclude the story of the Revolution with a depiction of a soldier’s return home.
He has hung the weapons of war – the musket and powder horn, faithful companions through years of grueling struggle – over the family hearth. A welcoming fire blazes and he smiles at his wife and young son. The American people, having won their liberty through determination and discipline, are now free to enjoy it in peace. Yet, the new Nation would face many trials and difficulties in the immediate post-war years. An effective and durable form of government had to be created, sectional differences and conflicts resolved, and tensions on the borders and on the frontier dealt with. Many of the veterans of the Revolution would be drawn into other conflicts as the young Republic coalesced; indeed, the little boy shown in this window would be about his father’s age when the War of 1812 breaks out.
NKH
Intermedallion [Surrounding The Return of the Soldier and the Hanging of the Musket]
-
Lantern: Center lozenge: Ship’s lanterns were usually made of tin and originally enclosed with sheets of scraped cow’s horn, hence the old name “lanthorn.” Horn was susceptible to heat and hungry rodents, so in time this was replaced with sheets of mica; by the late 18th century, newer and tougher forms of glass began to be used, but mica remained common throughout the Revolutionary era. Although this particular lantern shines a red light, the convention of red for port and green for starboard was not adopted until the middle of the 19th century.
JRW
© Text copyright of Washington Memorial Chapel and courtesy of the God's Glass Project.
© Photos copyright of Sam Cornwall, licensed exclusively to Washington Memorial Chapel and courtesy of the God's Glass Project.
Unauthorized sharing or distribution of text or images from this website is strictly prohibited without written permission from the copyright holders.